Maxiter
A way fast PHP project builder
Introduction
- Maxiter v1.6.3
- Author : Victor Béser
- Repo Dir : https://github.com/maxiter-php/maxiter
- License : MIT License
Maxiter is a PHP framework designed to be an easy, simple and fast
project builder.
A lot of frameworks beside the world are very awesome and powerfull, but
with great power needs some great machines
to load all of it content.
Thinking about this Maxiter was created!
A clean, fast and easy framework to build some stuff like BPM or
whatever project you want to in some old machines or legacy stuff
like PHP 5.3+ the almost exactly way it works
in PHP 8.2+, all the security and force be with you.
Requirements
You will need the following sofwares to get into Maxiter:
- Git
- PHP
- Composer
- Apache/Nginx/Docker or something like
Tip: You could easily use XAMPP to configure your apache or just Docker
Tip Again: Remove the "require __DIR__ . "/../../vendor/autoload.php" line in
LoadModel file if you don't want to use composer.
And that's it! Easy huh?!
Getting Started
Cloning main files from GitHub or using Composer
git clone https://github.com/maxiter-php/maxiter.git
The first step to configure your Maxiter framework is cloning the main files from GitHub.
composer create-project maxiter/maxiter:dev-main
Or set up the main files using Composer.
cd maxiter
Now you can go inside the folder that the clone command created for us. Initiate your server using some XAMPP-like/Docker htdocs, www or html. And you're done! Easy and fast.
IMPORTANT!
Avoid security problems using the command line below to create a .gitignore with all non-prod files:
php maxiter config prod
Or use the following command to delete all non-prod files:
php maxiter deltoprod
Optionally you could use the -f flag to move all files instead delete:
php maxiter -f deltoprod
Model View Controller (MVC)
MVC Design Pattern
Maxiter uses MVC Design Pattern, let's understand what it means exactly.
MVC stands for Model-View-Controller, and it’s a design pattern commonly used in software development, especially for building user interfaces. The pattern helps to separate concerns within an application, making it easier to manage, scale, and test. Here’s a breakdown of the three components: Model: Represents the data and the business logic of the application. It manages the data, rules, and logic of the application. When the data changes, the model notifies the view to update itself. View: The user interface (UI) that displays data to the user and sends user commands to the controller. It renders the model’s data to the user and is responsible for the presentation layer of the application. Controller: Acts as an intermediary between the model and the view. It handles user input, processes it (often by calling methods on the model), and updates the view accordingly.
How it Works
When a user interacts with the view (e.g., clicking a button), the controller receives this input. The controller then makes changes to the model based on the input. After the model updates, it notifies the view to refresh its display with the new data.
Benefits of MVC
Separation of Concerns: Each component has a distinct responsibility, making it easier to manage. Reusability: Models can be reused across different views. Testability: Components can be tested independently, leading to better software quality. Scalability: The architecture supports the growth of applications by allowing for easy modifications and expansions.
Overall, MVC is a powerful pattern that enhances the structure and maintainability of software applications!
Folders & Files
/app
The /app folder contains all controllers and models for our project.
/docker
The /docker folder contains all you need to configure your container.
/resources
The /resources folder contains all the resources, including the views, of our project.
/routes
The /routes folder contains all stuff for your API routing.
/src
The /src folder contains all source stuff for your project, like a copy of the main template in /template or some usual SQL in /tables.
/.htaccess
The /.htaccess file contains all configurations for our project, including the routing configuration.
/env.ini
The /env.ini file contains all configurations for our project environment, like app name, description or databases configuration.
/index.php
The /index.php file contains all configurations for our project routing stuff.
Again, that's all. Way fast huh?!
Views Pattern & IUFD
Views
The /resources/views folder should contain all of assets, css or js folders and files to work on all your project front-end.
Pages
The /resources/views/pages folder should contain all of your components, using IUFD, and pages separated by folders.
IUFD
The Included Undescore File Divisor or just IUFD is a
method to componentize your front-end with separated functions.
The IUFD let us create some component like navbars or sidebars by creating a folder with the
'_' first, like /resources/views/pages/_navbar/navbar.php and then include
them with
'include' method of PHP in our pages.
                            /resources
                                /views
                                    /pages
                                        _header/                    # The component folder with header file of your application;
                                            header.php              # The component file with all header of your application;
                                        _navbar/
                                            navbar.php
                                        _footer/
                                            footer.php
                                        home/                       # The home page folder with the css and js of home.php file;
                                            css/
                                                home-css.css
                                            js/
                                                home-script.js
                                            home.php                # The home.php file, here we start using the require header.php method;
This is the pattern you should use.
<'?php require __DIR__."/../../../../app/models/LoadModel.php"; ?>
<'!DOCTYPE html>
<'html lang="pt-br">
<'head>
A Header component example.
<'/body>
<'/html>
A Footer component example.
                            # Including the header component in your home page
                            <'?php include __DIR__ . "/../_header/header.php"; ?>

                            # Including the css of your home page


                            # The content of your home page

                                Home Page


                            # Including the js script of your home page


                            # Including the footer component in your home page
                            <'?php include __DIR__ . "/../_footer/footer.php"; ?>
An example of using components on home page.
Routing
The routing system of Maxiter will help you to go fast with your project, all you need is
following the pattern we already saw here.
Just create some new folder with the name of your page, like
resources/views/pages/about/
Then create a .php file using the same name of the page, going be like
resources/views/pages/about/about.php
You should be able to access this about page in http://localhost/about
And done! Just follow the pattern of creating some file and including components.
Databases Connection
To connect the databases in our project it's pretty simple, just need to edit the env.ini file with the informations of your database connection like host, port, driver, user and password in a new section.
                                    [mysql_example]
                                    DB="mysql_example" ; Must be the same name as the [section]
                                    DRIVER="mysql"
                                    PORT="3306"
                                    HOST="localhost"
                                    USER="root"
                                    PASS="user_password"
We start the section with the '[section_name]' and then with the variables with informations.
This is the main configuration, don't change it at least you know what you doing.
Using it in a controller
We recommend to use AJAX lib for your requests for the controller, this will facilitate your life as a programmer.
                                    document.addEventListener('DOMContentLoaded', () => {

                                        console.log("This is the /resources/views/pages/home/js/home-script.js file!");

                                        $.ajax({
                                            url: path.APP_BASE_URL + "app/controllers/TestController.php",
                                            type: "GET",
                                            success: function (response) {
                                                console.log("From controller:", response);
                                            }
                                        });

                                    });
Using AJAX to get a controller example.
In your controllers you can use the following commands to reach your database configured in env.ini file.
                                    # TestController.php

                                    # The DatabaseModel::connection() use the name you use for the database in env.ini, like DatabaseModel::connection(EnvModel::env("DB")) and the execute() method receive a query as param;
                                    $result = DatabaseModel::connection(EnvModel::env("DB"))->execute("SELECT * FROM users")
                                    $res = $result->fetch(PDO::FETCH_ASSOC);

                                    # ResponseModel::json return true or false as the first param and the data received in $res variable, all encoded to JSON with an exit() in the end.
                                    ResponseModel::json(true, $res);
An example of connection with the database and using queries without params to get data JSON encoded.
                                    # TestController.php

                                    # The DatabaseModel::connection() use the name you use for the database in env.ini, like DatabaseModel::connection(EnvModel::env("DB")) and the execute() method receive a query as the first param and the params of query as the second param;
                                    $id = 11;
                                    $result = DatabaseModel::connection(EnvModel::env("DB"))->execute("SELECT * FROM users WHERE id = :id", [
                                        ":id" => $id
                                    ]);

                                    # ResponseModel::json return true or false as the first param and the data received in $res variable, all encoded to JSON with an exit() in the end.
                                    ResponseModel::json(true, $res);
An example of connection with the database and using queries with params to get data JSON encoded.
                                    # TestController.php

                                    require __DIR__ . "/../models/LoadModel.php";
                                    require __DIR__ . "/../models/SecureRequestModel.php";
This requires are very important for the security and working of your project, you need to use them in every Controller you create.
                                    # TestController.php
                                    <'?php
                                    require __DIR__ . "/../models/LoadModel.php";
                                    require __DIR__ . "/../models/SecureRequestModel.php";

                                    class TestController {

                                        public function test() {

                                            $id = 11;
                                            $result = DatabaseModel::connection(EnvModel::env("DB"))->execute("SELECT * FROM users WHERE id = :id", [
                                                ":id" => $id
                                            ]);
                                            $res = $result->fetch(PDO::FETCH_ASSOC);

                                            ResponseModel::json(true, $res);

                                        }

                                    }

                                    $controller = new TestController();
                                    $controller->test();
This is the complete example of a controller
Using the environment variables
You can easily use all the environment variables with the EnvModel in Maxiter, let's see how.
                                    # env.ini
                                    [app]
                                    APP_BASE_URL="http://localhost/"
                                    APP_NAME="Maxiter"
                                    APP_DESCRIPTION="A way fast PHP project builder"

                                    [timezone]
                                    DEFAULT_TIMEZONE="America/Sao_Paulo"

                                    ; DATABASES
                                    [mysql_example]
                                    DB="mysql_example"
                                    DRIVER="mysql"
                                    PORT="3306"
                                    HOST="localhost"
                                    USER="root"
                                    PASS=""
This is an example of env.ini, if we want to use the APP_NAME variable to return the "Maxiter" text declared, we need to use the EnvModel.
                                    # The EnvModel is alread loaded in LoadModel called in _header/header.php component, so you can use it in any Model file or View page.

                                    echo EnvModel::env("APP_NAME");

                                    # This will return: "Maxiter"
Returning the APP_NAME variable using EnvModel.
Maxiter Models
Usage of Models from Maxiter PHP
In Maxiter you will have some Models, they exist to improve your usage and facilitate your development. Some of them are not common usable so they are not here and you don't need to understand them unless you want it.
AuthModel
This is an usefull example of how authenticate and authorizate users in your project. This is usually a common way to do it but you could try any other ways to do it as your wish.
AuthModel::verify("[PAGE_TO_REDIRECT]", ["ROLE_1", "ROLE_2"])
Use it to verify if there is any session variable called "logged". You must initiate
as true when
user do loggin in your application.
Example: $_SESSION['logged'] = true;
Checkout the example in app/controllers/UsersController.php
                                    # Check if user is authenticated with $_SESSION["logged"]
                                    if(AuthModel::verify()) {
                                        ResponseModel::json(true, "Is Authenticated!");
                                    }
This will check if there is any session called "logged" and return true or false;
                                    # Check if user is authorized with $_SESSION["authorities"]
                                    if(AuthModel::verify(null, ["administrator"])) {
                                        ResponseModel::json(true, "Is Authorized!");
                                    }
This will check if there is any session called "logged" and return true or false;
AuthModel::getContext()
Use it to get the context data from any logged user. You must set up an array with columns from database into a session variable called "userContext" after login logic. Check out the example in app/controllers/UsersController.php
The id of the user logged is: <?php echo AuthModel::getContext("id") ?>
Using the getContext to return the column "id" from the array in userContext variable;
                                    // Escaping special chars with TreatModel
                                    $data = TreatModel::escape($_POST);
                                    $user = $data['user'];
                                    $password = TreatModel::hash($data['password'], "md5"); // Hashing password with TreatModel, you could use 'md5' or 'hash'

                                    // Searching for an especific user in database using DatabaseModel with params
                                    $result = DatabaseModel::connection(EnvModel::env("DB"))->execute("SELECT * FROM users WHERE username = :user AND password = :pass", array(
                                        ":user" => $user,
                                        ":pass" => $password
                                    ));

                                    $resultFetch = $result->fetch(PDO::FETCH_ASSOC);

                                    // Returning JSON with ResponseModel
                                    if($result->rowCount() != 0) {
                                        $_SESSION['logged'] = true; # Set up the 'logged' session to get the verify() logic;
                                        $_SESSION['userContext'] = $resultFetch; # Set up the 'userContext' to get the getContext logic;
                                        ResponseModel::json( true, "User is ok!");
                                    } else {
                                        ResponseModel::json( false, "User is not ok!");
                                    }
Example of a login and setting up the verify and getContext functions from AuthModel;
PagesTitleModel
PagesTitleModel let you be able to set different title tag for your pages.
PagesTitleModel::title($title)
This function requires a string as a param and will set up an especific title for your current page.
<?php PagesTitleModel::title("Maxiter - Home Page"); ?>
The title for this page will be "Maxiter - Home Page".
ResponseModel
ResponseModel is going to facilitate your life, it returns back a JSON encode with two args, 'status' and 'data'. Status should be a bool true or false and data you should send arrays or strings or whatever you want to.
ResponseModel::json($status, $data)
ResponseModel requires two args, set up status as true or false and data as your wish as written before.
                                    // Returning a string
                                    ResponseModel::json(false, "Error while setting up your data!");

                                    // Returning an array
                                    ResponseModel::json(true, array("Apple", "Banana", "Orange"));
All returns will be encoded JSON as well:
{status: true, data: {"Apple",
"Banana", "Orange"}}
TreatModel
The Treat model apply some treatments for you.
TreatModel::escape($toEscape)
The TreatModel escape function will escape all your chars, this increase security into your application, avoiding SQL Injection and stuff like that. It requires any string or an array.
                                    // Escaping chars using TreatModel::escape() function
                                    $text = "Hello! Some chars are not allowed, right? -> Yes.";
                                    $secureText = TreatModel::escape($text);
The $secureText variable will return something like:
"Hello! Some chars are not allowed, right? -> Yes."
TreatModel::isNull($array, $exception)
TreatModel isNull function checks if the array has any empty or null items. You can also pass as a param exceptions, it could be only one as a string or even more as an array.
                                    // Checking if the array has any item empty or null:
                                    $infos = array(
                                        "name" => "Jonh",
                                        "age" => null, // It could be empty ("")
                                        "description" => "A good student!",
                                    );
                                    if(TreatModel::isNull($infos)) {
                                        ResponseModel::json(false, "There is an item null or empty!");
                                    }

                                    // Checking if the array has any item empty or null but using exceptions
                                    if(TreatModel::isNull($infos, "age")) {
                                        ResponseModel::json(true, "All required items are filled!");
                                    }

                                    // It could be more than one exception
                                    if(TreatModel::isNull($infos, array("age", "description"))) {
                                        ResponseModel::json(true, "All required items are filled!");
                                    }
This function returns a bool status, true or false;
TreatModel::hash($string, $method)
The TreatModel hash function will hash your string, you can use "md5" or "hash" as a method; The "hash" method uses "password_hash" PHP function to hash your string;
                                    $password = "this_is_my_password";
                                    $md5Password = TreatModel::hash($password, "md5"); // or "hash" to use password_hash() PHP function
The $md5Password will return something like:
"a851308387ed93a0548c48b6150429aa";
TreatModel::file($file, $path, $extensions)
TreatModel file function will easily treat your files when using forms
with PHP.
Set up your $_FILES received in $file;
Set up the output path in $path;
Set up the allowed extensions for your file in array $extensions;
                                    // Treating a file with TreatModel file function
                                    $myFile = $_FILES['formFile'];
                                    $outputPath = "./assets/files/";
                                    $extensions = array("JPG", "PNG", "JPEG");
                                    $newFileName = TreatModel::file($myFile, $outputPath, $extensions);
The $newFileName variable will return the unique new name of your file
created in your output path, something like: "19f9137c453c.jpg"
If any other extension but $extensions given then will return false;
Maxiter CLI
Command Line for Maxiter
As some frameworks, you can easily use the Maxiter CLI by opening your terminal and typing some commands.
php maxiter new controller [ControllerName]
Will create a new Controller file in your controller path;
Example: php maxiter new controller RegisterController
php maxiter new model [ModelName]
Will create a new Model file in your model path;
Example: php maxiter new model Encrypt
php maxiter new view [ViewName] [TemplateName]
Will create a new View file in your view path;
Example: php maxiter new view LoginPage
Note: The TemplateName param is optional, it will use the @body tag content from your template/index.html to create a new page for you. When empty will create using the main Maxiter template content.
php maxiter new log [Database_Name]
Will create an Log file example in your model path;
Example: php maxiter new log mysql_example
php maxiter new table [table_name]
Will create an SQL file example in your src/tables path, you must use the name of the
existing tables references: users, logs, products, orders, customers, roles or
permissions;
Example: php maxiter new table users
php maxiter path [url_base_path]
Will set a new url base for your project. Don't forget to put a / at the end.
Example: php maxiter path http://localhost/my-project/
php maxiter new template [template_name]
Will set a new template for your project. Don't forget to put your template into
src/template/[template_name].
Example: php maxiter new template template_name
php maxiter new middleware [middleware_name]
Will create a new middleware file for your project into app/middlewares/.
Example: php maxiter new middleware BearerAuthMiddleware
php maxiter new api [api_controller_name]
Will create a new controller file especific for API routing for your project into
app/controllers/.
Example: php maxiter new api ApiTestController
php maxiter gui
You must set up your path before use GUI commandWill open a easily Interface for Maxiter in your browser.
Example: php maxiter gui
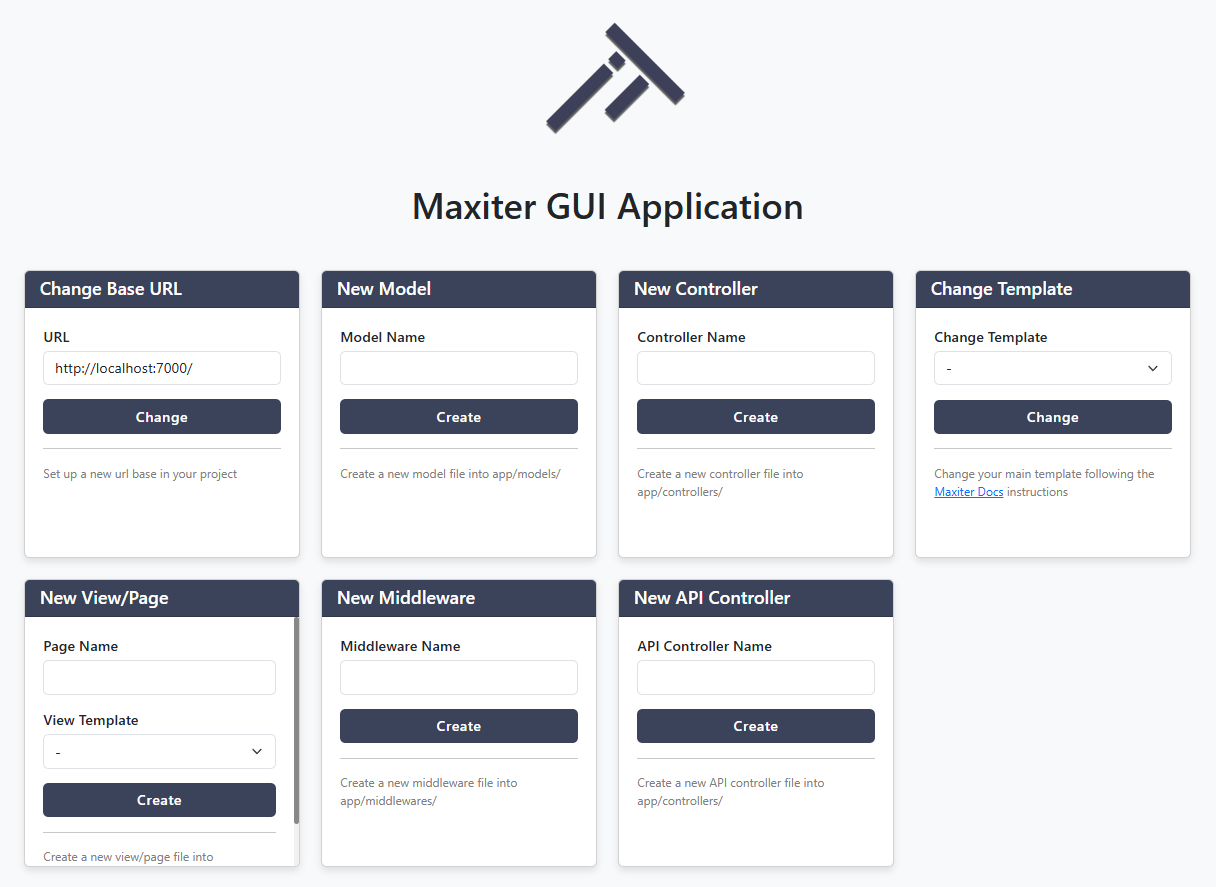
Set a new path, model, controller and other functionalities easily without command line.
php maxiter testme
You must install all composer dependencies with composer installRun your PHPUnit unit test. See more about it in "Unit Test" section!
Example: php maxiter testme
php maxiter config prod
Generate a .gitignore-example file with all non-prod things you should avoid using in your
production environment.
Example: php maxiter config prod
or
php maxiter deltoprod
Delete all non-prod files from your application.
Example: php maxiter deltoprod
or
php maxiter -f deltoprod
Using the flag -f (folder), move all non-prod files to a folder in your application.
Example: php maxiter -f deltoprod
php maxiter new component [component_name] [template_name]
Generate a new component into your application. You can use a template by
setting the @componentName tags in your template's index.html or just let
it null for an empty file.
Example: php maxiter new component searchbox or
php maxiter new component searchbox mytemplate
php maxiter autopath [optional: port]
This will try to auto define your application path, you can
set the port if you want to.
Example: php maxiter autopath or
php maxiter autopath 8075
Returns the main localhost path using main 80 port or
the defined port and the local of your project in your
computer as your project path.
Changing templates in Maxiter
You can easily use every (almost) bootstrap template in Maxiter, let's see how.
You should find some bootstrap template. Then just move the folder
with the index.html
inside the /src/template/ path.
Set Up your components
Edit the index.html of your new template and set up the tags to componentize your template.
                                    @header
                                    <!DOCTYPE html>
                                    <html lang="en">
                                    <head>
                                        <meta charset="UTF-8">
                                        <meta name="viewport" content="width=device-width, initial-scale=1.0">
                                        <title>New Template</title>
                                    </head>
                                    <body>
                                        @header

                                        @body

                                            @navbar
                                            <div class="navbar">
                                                <p>This is my navbar</p>
                                            </div>
                                            @navbar

                                            @sidebar
                                            <div class="sidebar">
                                                <p>This is my sidebar</p>
                                            </div>
                                            @sidebar

                                            <div class="body">
                                                <p>This is my body</p>
                                            </div>

                                        @body

                                        @footer

                                        <script>
                                            document.addEventListener("DOMContentLoaded", () => {
                                                console.log("This is some JS function that I'm going to use in all my pages.");
                                            });
                                        </script>
                                    </body>
                                    </html>
                                    @footer
All the content between the tags will be separated as a component in your application. Then you just need to include them in your project as your wish.
Tags available: @header, @navbar, @sidebar, @body and @footer
With this ready, open your CMD/Terminal (or use php maxiter gui) and type:
php maxiter new template [folder_template_name]
You should receive some "successfully" messages in your CMD/Terminal, then just check it out!
Custom Component
You can easily set a custom component in your index.html, just set it using the Maxiter tags pattern.
                                    @header
                                    <!DOCTYPE html>
                                    <html lang="en">
                                    <head>
                                        <meta charset="UTF-8">
                                        <meta name="viewport" content="width=device-width, initial-scale=1.0">
                                        <title>New Template</title>
                                    </head>
                                    <body>
                                        @header

                                        @body

                                            @navbar
                                            <div class="navbar">
                                                <p>This is my navbar</p>
                                            </div>
                                            @navbar

                                            @sidebar
                                            <div class="sidebar">
                                                <p>This is my sidebar</p>
                                            </div>
                                            @sidebar

                                            <div class="body">
                                                <p>This is my body</p>
                                            </div>

                                        @body

                                        @mycustomcomponent
                                            <div class="custom">
                                                <p>This is my custom component!</p>
                                            </div>
                                        @mycustomcomponent

                                        @footer

                                        <script>
                                            document.addEventListener("DOMContentLoaded", () => {
                                                console.log("This is some JS function that I'm going to use in all my pages.");
                                            });
                                        </script>
                                    </body>
                                    </html>
                                    @footer
After setting up the custom tags, use the command line:
php maxiter new component mycustomcomponent mytemplate
If you just want to create a new and empty file without template use:
php maxiter new component mycustomcomponent
Unit Test in Maxiter
Maxiter uses PHPUnit to do all the tests, a pretty awesome tool that let us coverage all lines of our controllers or whatever you want to.
Install all the dependencies using composer:
composer install
Create a new unit test file:
php maxiter new unittest UsersController userLogin
Test your application:
php maxiter testme
If you used correctly the PHPUnit lib, then you should receive some "OK" message.
Check the /app/controllers/UnitTestController and /tests/UnitTestControllerTest to see the example.
Easy Tutorial
Let's do it together and see how it works. Just follow the tutorial below and happy coding!
For this tutorial we will use Docker, if you are using XAMPP or
something like, just clone the Maxiter in your main folder, like 'htdocs'
and configure your path with php maxiter path http://localhost/
or php maxiter autopath to try set up automatically.
Clone the Maxiter into your computer with the name "first-app":
                                    # Using Git
                                    git clone https://github.com/maxiter-php/maxiter.git first-app

                                    # Using Composer
                                    composer create-project maxiter/maxiter:dev-main first-app
Go into your folder:
cd first-app
Build your container:
docker-compose build
Initiate your container:
docker-compose up -d
Configure your main path:
                                    # Using Docker, the main port will be 7000, you can change this in configurations, so:
                                    php maxiter path http://localhost:7000/

                                    # If you are using XAMPP or Apache-like, try the auto path
                                    php maxiter autopath [optional: port]
Install all the dependencies using composer:
composer install
Now just access your project url http://localhost:7000/ (if you are using Docker) and start coding!
Tip: If you are using PHP 5.3, follow the instructions into your-project/index.php file!
Any trouble? Check out the video tutorial: